Pages

Grand Trunk Micro Camp Stool Review

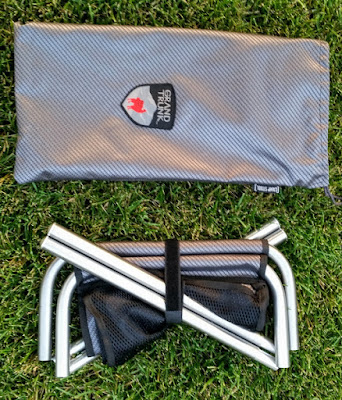
The Grand Trunk camping stool is lightweight and collapsible making it ideal for hikers, campers, and motorcyclists. The stool is small enough to pack on your bike and big enough for a seat when needed. The seat area is 12.6 inches by 10.6 inches and sits at a height of 14.5 inches.


The nylon seat is tough enough for outdoors use and the mesh storage area under the seat is a convenient place to put glasses, a flashlight or anything else you want to keep close. The entire seat has a weight capacity of 250 pounds. 


The stool breaks down by removing the legs which are attached to the seat frame with shock cord, just like a tent. This also makes it fast and easy to set up. No tools are required to set up or break down the stool and when broken down, the entire stool goes into a storage bag. This compact package can fit in your saddlebag or backpack.


For motorcycle traveling the stool easily fits inside my Pelican 1450 case with some room to spare. It weighs just 22 ounces, making it lighter and easier to carry than a full sized folding chair on your bike.


I've used this stool on several moto-camping trips and I like that it's small, lightweight, easy to set up and take down. The four legs make it more stable and comfortable than those three legged stools. It's also less expensive than similar chairs on the market.


Most importantly, it keeps my butt out of the dirt and pine needles during my morning coffee and that makes for a good morning in the forest.

Wolfman Expedition Saddlebags

If you like the idea of soft luggage on the KLR, these Wolfman Expedition saddlebags are a good option. They are tough and will carry a lot of adventure gear or whatever you haul on your bike.


The Expedition saddlebags have been around for a while and have earned a great reputation. They are waterproof, durable and come in yellow or black. I like the yellow for greater visibility on the road.


Wolfman devised the Universal Saddlebag Straps which allow you to mount these bags on many different types of racks. I use these Precision Motorcycle Racks and they work fine. Installing the bags is quick and easy.


The first step is to lay the bags across the bike. Then adjust the main straps so the bags hang at an even height on each side of the bike.


Next, each bag attaches to the side rack using the Universal Saddlebag Straps. There are four straps for each bag, two on the front and two on the rear. Above are the front attaching points on the right side bag.


This picture shows the two rear straps for the right side bag. These small straps work great for keeping the bag secure on the rack. Adding some gear inside the bag will provide some shape and make mounting them easier.   


My rain gear is stuffed in the bottom of this bag, and there is room for a lot more. Each bag has a 19 liter capacity. If you prefer to avoid metric conversions, just remember these bags hold a lot of gear when they are carefully packed.


With the bag packed, tighten the upper and lower horizontal straps across each bag. This pulls them tight against the racks where they will remain pretty secure.


The top of the bag rolls down and is secured with a vertical strap on the front and rear. Be sure to let the air out as you roll the top down.


Finally, this "V" strap threads from the back, through a front D ring and clips on the back side again. Pull this one tight to squash down the top of the bag and you are done. 


Before starting down the road it is good practice to double check all straps and ensure everything is secure. At the first stop, give the straps a tug to ensure all is well. A couple are normally a bit loose, but after the contents of the bags shift and settle down, the straps stay very secure. 

After the ride, the Expedition bags are easily removed and stored, or leave them mounted to provide your bike some extra hauling capacity. Their only drawback is the inability to lock, so don't leave any valuable art work in them when overnight parking on the street.